|
| |
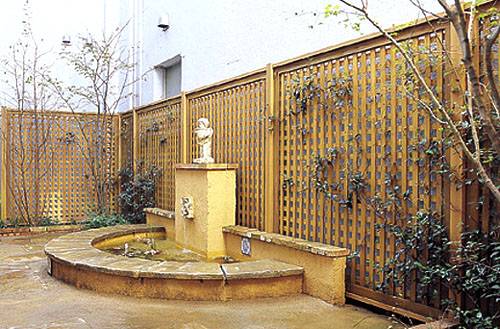 Cedar wood lattice screen panel
Lattice fence screen panels are used to hide any kind of
imperfections in your yard, or for decorative purposes. You have the choice of
either the
bamboo lattice fence, or the
cedar wood lattice fence.
You may have an unsightly HVAC unit lying on the ground next to your home,
where you'd rather have plants. Or perhaps you'd like to fence in a garbage
storage area or the underpinnings of a deck, so that they're not so visible.
Lattice fence screens work well for these and other screening needs. Vines can
later be trained up the wood lattice fencing to provide further screening.
Here's How:
- If the lattice screen is to be freestanding, install
posts to support the lattice. In turn, the posts will be sunk into the
ground and supported by concrete. In this project I'm referring to wooden
posts and a wood lattice (not vinyl). If the lattice fencing is 4' x 8',
you'll need to space the 2 postholes about 8' apart. Err on the side of
spacing them a bit closer (you can always trim excess lattice).
- Dig the 2 postholes. In cold climates you must dig 3'
down, so that you'll get below the frost line. This will prevent heaving
during freeze-and-thaw cycles. Even in warmer climates, consider digging to
this depth to provide tall posts (7' or more) with more stability.
- Apply 2" of crushed stone to the bottoms of the postholes
for improved drainage for your lattice fence.
- Here comes the tough part! You'll be setting 8' long 4x4
pressure-treated posts into the postholes now. However, the success of your
project hinges on getting them properly aligned and plumbed, and on getting
their tops to end up level with each other.
- Begin by setting them in the holes and bracing them
temporarily. Temporary braces (using scrap lumber) can be nailed to the
posts to hold them up. Adjust the braces so as to get the posts roughly
plumb. Place the wood lattice up against the posts.
- If you're on level ground, use the top of the lattice
fence now as a guide to determine how high you want your posts to be (but if
you're working on a slope, see Tip #1 below). For instance, if you're using
decorative post caps, you may wish to have the posts extend 1' above the
lattice. Mark the places to cut with a pencil, then disassemble your
temporary work, make the cuts, and reassemble.
- Now that you've taken care of the height of the posts,
turn your attention to alignment. Again adjust the braces so as to get the
posts roughly plumb, and place the lattice fence temporarily up against the
posts again, to see how well the posts line up with each other.
- Since lattice is flexible, alignment does not have to be
exact; but get it as close as possible, by adjusting the placement of the
posts in their holes. If you measured carefully before digging the
postholes, the adjustment should be minimal.
- Satisfied with the way the posts align with one another,
you can now tackle the chore of getting each post exactly plumb, all the way
around, using a carpenter's level. When you've achieved this, tighten the
braces, so as to hold the posts of the lattice fencing firmly in position.
- You're finally ready for the concrete! When shopping for
concrete, ask your home improvement store salesperson for the type that you
just pour into the hole, dry, then soak with water.
- Such "quick-setting" concrete doesn't have to be mixed
before pouring, saving you the effort of first mixing concrete, then
shoveling that heavy mix into the holes. With quick-setting concrete, you
just empty the contents of the bag into the hole, then soak the concrete
using a garden hose. For 3'-deep postholes you'll need about 5 bags per
hole. Let the concrete cure overnight. End of Day 1.
- Don't worry: Day 2 will be much easier! Prop the lattice
fence panel up against the posts. Mark where you want to screw the lattice
fencing to the posts. Still propping the wood lattice up in place, pre-drill
through these marks, right into the posts. Now screw the lattice fenc onto
the posts, using the holes that you pre-drilled. Trim any excess lattice
hanging over the ends with a jigsaw.
- Affix decorative post caps (if any) according to
manufacturer's directions.
- You can now plant any climbing plant that you wish to
train up the wood lattice screen. Flowering vines, particular, will dress up
your lattice fence considerably. Just create your
planter box or
raised bed
in front of the lattice screen, at its base.
Tips:
- If you're working on a slope, it'll be more trouble to
determine post heights. Brace the posts temporarily. Run a string with a
string level from the top of the downhill post to the top of the uphill
post, securing temporarily with tape. Then start bringing the uphill end
down, checking to see at what point you reach level. At that point, mark the
uphill post, disassemble bracing, and make cut.
- Don't install your lattice screen right up against
an HVAC unit. Make sure there's plenty of "breathing room." This spacing
will also ensure easy access should repair work need to be done on the HVAC
unit.
- You have some options with pressure-treated wood, in
terms of a finish. The maintenance-free option is to let it weather to a
natural finish. You could stain it or paint
it, if you do not like the natural finish. You may find it easier to do the initial staining or painting prior to
installation. Of course, when it comes time to re-stain or re-paint, you
won't have this option.
What You Need:
 | tape measure |
| carpenter's level |
| string level |
| posthole digger or shovel |
| circular saw, jigsaw |
| drill, screws |
| hammer, nails |
| quick-setting concrete |
| two 4x4 treated posts |
| 4x8 treated wood lattice |
|