|
| |
| |
Fence Posts Installation
|
Fence
posts is the structural support of all fencing, so to set the posts up
right is the most important and the first step of fencing
installation. Fences keep what you want in the yard and unwanted
guests out. They also add interest to your backyard or garden. A fence
may seem like a labor intensive and artistically challenged project,
but it doesn't have to be. You can buy pre-built fence panel, or kits.
Below is a step by
step instructional guide on how to set up fence posts with our
fencing products.
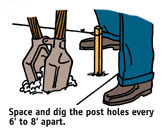 |
Step 1: Spacing the Fence Posts
As a rule, you should set fence posts about 6' to 8' apart. The
spacing of the posts depends on the type of fence you build, the
terrain, the purpose of the fence, and other such factors.
Set the corner or end post first. Then stretch a line from
each corner or end post to align all the posts in between.
Drive a stake every 6' to 8' at the exact position where the
post hole is to be dug.
Take time to measure and position the posts accurately. The
appearance and the structural strength of your fence depends a
great deal on the positioning of the fence posts. |
| |
|
 |
Step 2: Setting the Fence Posts
Set all wood fence posts with about 1/3 of their total length
buried in the ground. This is especially important on corner posts
and any posts that will carry heavy weight or withstand high wind
pressure.
Use a regular post hole digger to dig the post holes. Dig
the holes straight to the proper depth at each stake marker.
You can anchor the posts more firmly by making the holes
slightly larger at the bottom than at the top. Place a large stone
or two shovels full of gravel in the bottom of each hole. This
provides drainage to avoid excessive moisture at the base of each
post.
Use a wood preservative to treat the section of the post
that will be underground. Allow the post to stand overnight in the
preservative so it can become well-saturated. |
| |
|
 |
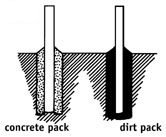
Step 3: Packing the Posts
You can pack the posts with either dirt or concrete. In either
case, place two or three shovels full of gravel in the bottom of
each hole before the post is placed into position.
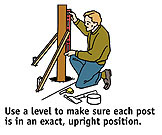
Be sure the posts are in an exact, upright position. You can
check the alignment of each post with a regular level. You can
also check the alignment of the posts in one direction by sighting
from one end of the row of posts to the other.
Brace each post with stakes after it is properly aligned.
Keep the stakes in position until the concrete (if used) has
thoroughly set. Remove the nails holding the braces and readjust
the post until it is in accurate alignment.
When the post is properly aligned, tamp it thoroughly to
pack the dirt (if used) around the base of the post. Be sure you
do not alter the alignment of the post during the tamping process.
|
| |
|
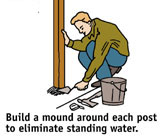 |
Step 4:
Setting the Posts
When the post is firmly in position, build a mound around it to
help eliminate water standing at the post base. Slope the concrete
slightly away from the post and round it off with a trowel. Tamp
the concrete lightly to eliminate any air bubbles left in the
mixture that can act as water pockets. |
|
|
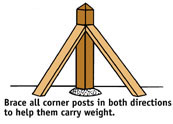 |
Provide extra bracing at all corners. A corner post must carry the
weight of fence stretched in two directions, so it should be set
in both directions. Allow the posts to stand several days and
settle firmly in position before adding the fence.
The heads of posts should be rounded, capped or slanted to
help eliminate accumulating water, which can cause rotting. This
is well-worth the effort since it allows the posts to last.
|
|
|
|