Before you
start
Our pre-fabricated fence panels without footing comes in a
standard 4' width, or 6' is also available. Heights may vary.
Standard fence posts are 4x4 square. Remember to buy the
correct length of the post and can be
topped with a cap or finial.
Posts must be positioned accurately and anchored firmly. They
can be buried deeply with concrete footings, but any parts buried under soil may
rot; we recommend metal post sockets that are hammered vertically into the soil
to make posts easy to remove and replaced should the need arise. Longer sockets
are available for taller fences to ensure better stability.
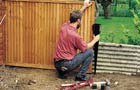
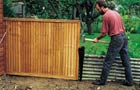
When erecting the fence, remember to work in sequence. Start
by attaching the first panel to a wall or building, or putting in the first
post. Take it one panel at a time, following the line of your boundary.
Step by step
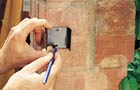
1 If you're attaching
the first panel to a wall, mark the position of the screw holes for the bracket that
will hold it in place. One bracket should sit just below the top of the panel;
the other should be just above the base.
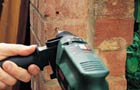
2 Using an electric
drill fitted with a masonry bit, drill holes in the wall in these positions.
Push a plastic wall plug snugly into each hole.

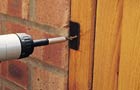
3 Screw each U-shaped
metal bracket firmly into place. Use a spirit level to ensure they're both
square and double check that they line up with each other.
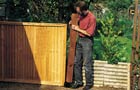
4 Push the fence panel
into position, slotting it tightly into the metal brackets. Once you're happy
with the fit, fix both sides of the panel securely with screws.
5 Carefully choose the
position for your first post. Place the metal post socket tightly up against the
adjoining fixed fence panel in a vertical position, checking it with a spirit
level.
6 Fit the socket dolly
into the top of the socket to protect the metal and knock the socket into the
ground with a sledgehammer. Check regularly that the socket is still straight.
If it's leaning to one side, tap the socket's sides to reposition it.
7 Continue tapping in
the socket until the top sits just above soil level. Remove the socket dolly and
push in the fence post. Tighten the bolts so they grip the base of the post
tightly.

8 Using the drill, make
guide holes at the top and bottom of the fence post into which the L-shaped,
metal fencing clips can be fixed. Don't make the holes too large - they're just
a guide.

9 Screw the L-shaped
fencing clips into each hole. This is best done with a pair of pliers. Position
the clips so they'll be visible from either the front or rear of the panel.
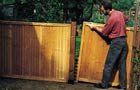
10 Fix the next panel
in place against the post. Stand it on spacers, such as a brick or piece of
wood, so it isn't resting directly on the soil as this can cause the panels to
rot at the base.
11 Screw through the
L-shaped fencing clips at the top and bottom into the frame of the panel to hold
it securely in place. Repeat for further posts and panels until your fence is
finished.
Points to remember
Fences should only be erected on your own land and shouldn't
cross any boundaries. Discuss any projects with your neighbors and if either of
you have any doubts, seek legal advice.
Local by-laws and covenants may prevent fences being put up in
some areas. Check property deeds or consult a solicitor.
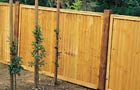
Never rest fences directly on the soil or pile soil against
them, as this will encourage rotting. Leave a space between the bottom of the
fence and the soil. Alternatively, place a gravel board along the base of the
fence, which is easy to replace if necessary.